2025 Guide: How to Get Plexiglass Cut to Size for Your Projects
As the demand for customized plastic solutions continues to rise, the process of having plexiglass cut to size has become increasingly popular among both DIY enthusiasts and professional contractors alike. According to the Plastics Industry Association, the U.S. plastics market was valued at over $403 billion in 2020, with a significant segment dedicated to acrylic products like plexiglass, which have seen a surge in usage due to their versatility and durability. This trend is bolstered by the rising interest in home projects, commercial installations, and protective barriers across various industries.
In 2025, mastering the art of getting plexiglass cut to size will be essential for anyone looking to achieve precision and efficiency in their projects. Whether it’s for crafting, building enclosures, or designing display cases, knowing the right techniques and sources for obtaining perfectly sized sheets can greatly enhance the final result. Moreover, industry forecasts indicate that the global acrylic market is expected to grow at a CAGR of 6.0% from 2021 to 2028, underscoring the importance of staying informed about the latest cutting methods and supply options to meet this demand effectively. By optimizing the process, individuals can not only save time and reduce waste but also ensure the highest quality outcomes in their creative endeavors.

Understanding Plexiglass: Properties and Uses in Projects
Plexiglass, known for its clarity and durability, is a versatile material widely used across various projects. Its lightweight nature makes it easier to work with compared to glass, while still providing excellent resistance to weathering and impact. This makes plexiglass an ideal choice for both indoor and outdoor applications, such as greenhouses, protective barriers, and display cases. Additionally, its ability to be easily shaped and cut allows for customization, making it suitable for DIY projects where precision is paramount.
When considering plexiglass for your project, it's important to understand some of its key properties. It has superior UV resistance, ensuring that outdoor applications maintain their clarity over time without yellowing. Plexiglass also exhibits excellent thermal insulation, adding energy efficiency to any structure. Whether you're crafting artistic installations or functional items, knowing these properties will help you leverage plexiglass’s strengths to achieve the desired results. Its versatility extends to various finishes, including frosted or tinted options, which further enhance its aesthetic and practical applications.
2025 Guide: How to Get Plexiglass Cut to Size for Your Projects
| Property |
Description |
Common Uses |
| Transparency |
Plexiglass is highly transparent, allowing about 92% of light to pass through. |
Windows, Display Cases |
| Lightweight |
Much lighter than glass, making it easier to handle and install. |
Signage, Shelving |
| Durability |
Resistant to impact and weathering, ideal for outdoor use. |
Aquarium Covers, Roofing |
| Ease of Fabrication |
Can be easily cut, drilled, and shaped with standard tools. |
Custom Projects, Home Décor |
| UV Resistance |
Blocks harmful UV rays, preventing fading and degradation. |
Outdoor Furniture, Greenhouses |
| Chemical Resistant |
Resists various chemicals, making it suitable for laboratory use. |
Protective Shields, Lab Equipment |
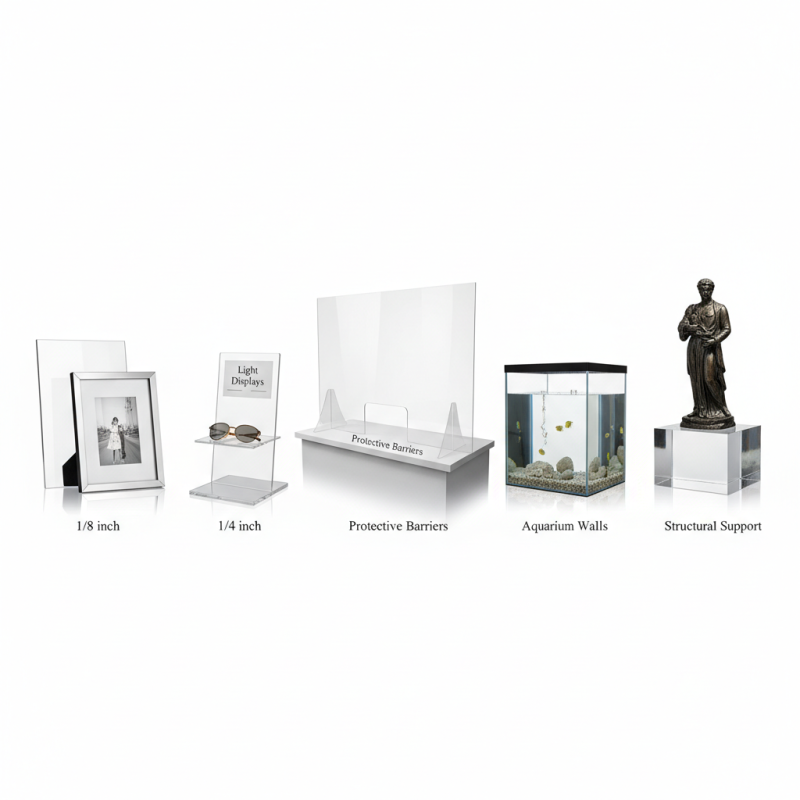
Choosing the Right Thickness for Your Plexiglass Needs
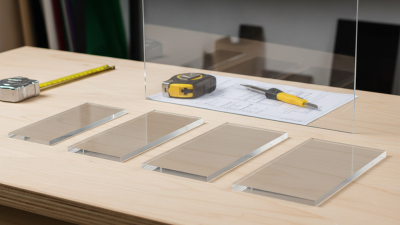
When working with plexiglass for your projects, one of the most critical factors to consider is the thickness of the material. Selecting the appropriate thickness is essential for ensuring that the finished product meets both aesthetic and functional requirements. Common thicknesses range from 1/8 inch to 1 inch, and the best choice will depend on the specific application. For instance, thinner sheets, around 1/8 inch or 1/4 inch, are often suitable for projects like picture frames or lightweight displays, whereas thicker sheets are better suited for structural applications, such as custom aquariums or protective barriers.
Beyond just the intended use, it’s also important to consider factors such as weight, ease of installation, and overall durability when choosing thickness. Thicker plexiglass tends to be more durable and resistant to impact, making it a wise choice for outdoor projects or areas where it might experience wear and tear. On the other hand, if the project requires flexibility or a lightweight solution, opting for a thinner sheet can facilitate easier handling and assembly. Understanding these nuances will help ensure that your plexiglass project not only looks great but also functions effectively for years to come.
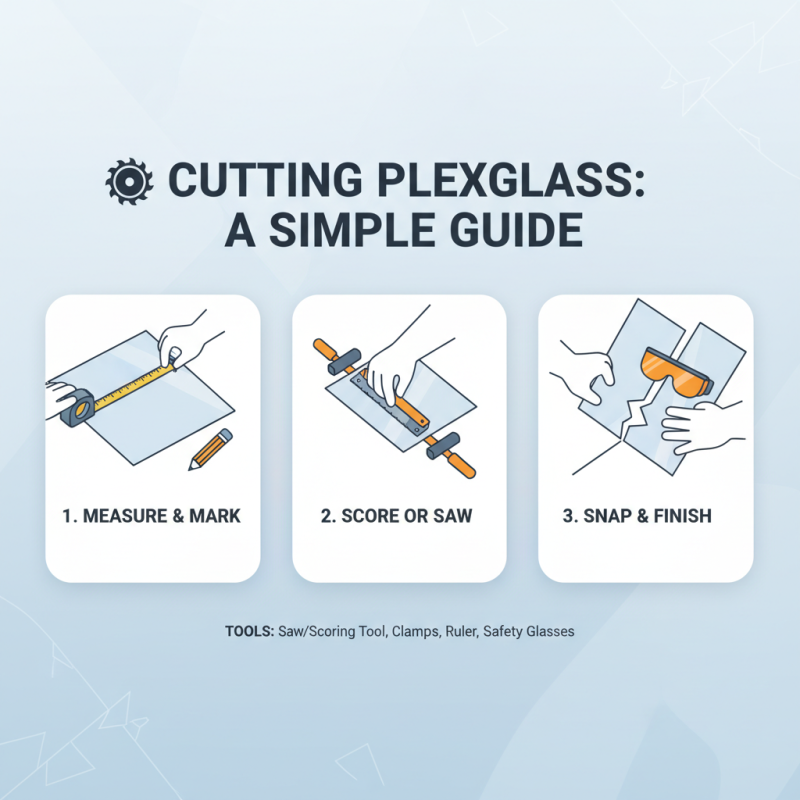
Tools and Materials Required for Cutting Plexiglass
When it comes to cutting plexiglass for your projects, having the right tools and materials is essential to achieve clean and precise cuts. Begin with a utility knife or a circular saw fitted with a fine-toothed blade specifically designed for cutting acrylic. According to a report by the International Acrylic Association, using the appropriate saw blade can reduce the risk of chipping by up to 70%. For smoother edges, consider using a sanding block or a heat gun, which can help in melting any sharp edges left after cutting.
In addition to cutting tools, safety gear is paramount. Protective eyewear and gloves will shield you from dust and sharp edges. A straight edge or a specialized cutting guide is also important to ensure accuracy when scoring or cutting the material. It’s recommended to have a clean workspace with a flat surface, as this not only enhances safety but also improves the precision of your cuts.
**Tips:** When cutting plexiglass, score the surface multiple times for a cleaner break, rather than trying to cut through in a single pass. Also, remember to clamp down the plexiglass securely to prevent it from moving during the cutting process. Following these practices will ensure your projects not only look professional but are completed safely.
2025 Guide: How to Get Plexiglass Cut to Size for Your Projects
Step-by-Step Instructions for Cutting Plexiglass to Size
Cutting plexiglass to size for various projects can be a straightforward process if approached methodically. First and foremost, ensuring you have the right tools is essential. According to recent industry reports, the global demand for acrylic sheets, which includes plexiglass, has been on a steady rise, highlighting their versatility in applications ranging from home decor to protective barriers. To begin, you'll need a fine-toothed saw or a scoring tool, along with clamps to secure the material. It’s crucial to measure your desired dimensions accurately, a step that many novice users overlook, as even slight miscalculations can lead to material waste.
Once you have your tools ready, start by marking the plexiglass with a straight edge and a fine marker. For thicker sheets, scoring the surface lightly with a utility knife multiple times along the marked line creates a groove, allowing for a clean break. For thinner sheets, a jigsaw or circular saw can be employed, with safety goggles worn to protect the eyes from flying debris. Industry experts recommend cutting with the "good side" facing down to avoid visible chipping. According to data from the Freedonia Group, the market for acrylics is projected to grow by 4% annually, emphasizing the importance of mastering this skill for various applications. Following these step-by-step instructions will ensure a professional finish, enabling the effective use of plexiglass in your creative endeavors.
Finishing Techniques for a Smooth Plexiglass Edge
When working with plexiglass for projects, achieving a smooth edge is crucial for both aesthetics and safety. Several finishing techniques can be employed to enhance the appearance and usability of the cut edges. One common method is sanding, which involves using progressively finer grits of sandpaper. This process begins with a coarser grit to remove any rough edges or imperfections, followed by finer grits to polish the surface to a clear, smooth finish. It's essential to sand in a consistent direction to avoid creating uneven surfaces.
Another effective technique is flame polishing, which not only smooths the edges but also adds a glossy finish. This method requires careful attention, as a flame is used to briefly pass over the edge, melting the surface just enough to eliminate scratches without compromising the integrity of the material. Safety precautions are paramount, and it’s important to work in a well-ventilated area and use appropriate protective gear. By mastering these finishing techniques, you can ensure that your plexiglass projects not only meet your design specifications but also maintain a professional and refined appearance.