Posts

How to Cut Clear Acrylic Sheets Without Cracking

Clear acrylic sheets can produce clean, polished-looking edges, but a rushed cut may leave chips or a crack running beyond the mark. The material is lighter than glass, yet it is not immune to stress. A sharp score, uneven support, or too much heat can change a neat project into a costly remake. Small details matter.

This guide explains how to choose a cutting method for the sheet’s thickness and shape, then prepare a stable work surface. You’ll see when a scoring knife may work and when a fine-tooth saw offers better control. Keep the protective film in place where possible, mark the cut clearly, and support both sides of the sheet. Test on scrap first. It is a step people often skip, and sometimes regret.

Cutting slowly helps, but slow alone is not a guarantee. A dull blade can rub and heat the acrylic, while excessive pressure can encourage cracks near an edge. Wear eye protection, keep hands clear of the cutting path, and follow the tool maker’s instructions. If the sheet begins to chatter, pause and check its support rather than forcing the cut. I still find this part easy to underestimate. No single method suits every sheet, so the safest choice depends on thickness, cut length, and available tools. After cutting, smooth rough edges gradually; aggressive sanding can create heat or visible marks. These practical steps make the process more predictable, though a perfect edge may take practice.
How to Cut Clear Acrylic Sheets Without Cracking

Understand Clear Acrylic and Common Causes of Cracking

How to Cut Clear Acrylic Sheets Without Cracking

Clear acrylic, or PMMA, is rigid, transparent, and more prone to brittle fracture than many flexible plastics. CAMPUS polymer-property data commonly lists PMMA density near 1.18 g/cm³ and linear thermal expansion around 60–80 × 10⁻⁶ per °C. Values vary by sheet grade. ASTM D696 describes a standard method for measuring thermal expansion, which matters because acrylic can expand and contract noticeably with temperature changes. I would not treat one number as a promise.

Cracks often begin at small defects. A chipped blade, a rough edge, or a tight clamp can concentrate stress in one spot. Heat can also soften the cut area, while vibration may make a thin sheet chatter against the workbench. Residual manufacturing stress can add to the problem, especially near drilled holes or sharp corners. Cast and extruded sheets may behave differently, so test the cutting method on an offcut when possible.

Tips: Support the sheet close to the cut and keep the protective film on. Use a sharp, suitable blade and steady feed; forcing the tool can overheat or chip the edge. Avoid excessive clamping pressure. That helps, but it is not foolproof.

Choose the Right Cutting Tools and Prepare the Work Area

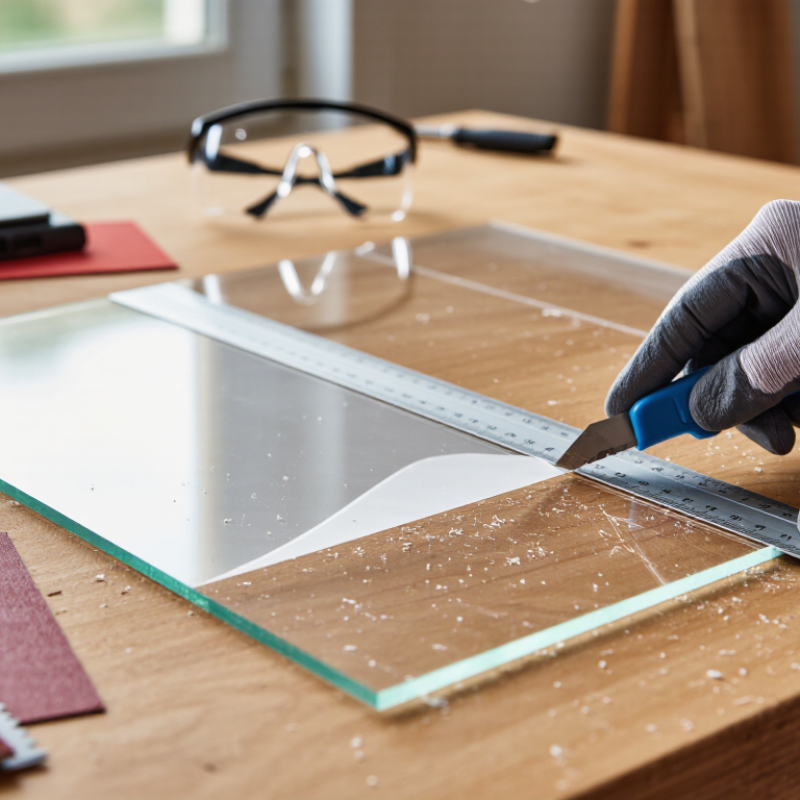
Choose a cutting tool that matches the sheet’s thickness. Thin acrylic can often be scored with a sharp acrylic-cutting knife, then snapped over a straight edge. Make several steady passes instead of pressing hard on the first one. For thicker sheets, use a saw fitted with a fine-tooth blade suitable for plastic. Test the setup on a scrap piece. A small trial cut can reveal chatter or melting before it affects the visible panel.

Prepare a flat, stable work surface and clear away grit that could scratch the sheet. Leave the protective film in place, and mark the cut line on it so the surface stays covered. Support the acrylic on both sides of the cut, then secure it with padded clamps. Check that the sheet cannot shift, but do not clamp so tightly that it bends. I used to pay more attention to the blade than to support; that was an easy mistake to miss.

Keep the cut line visible and your hands clear of the blade. Wear safety glasses, and use dust collection or suitable respiratory protection when the tool produces fine particles. Feed the sheet steadily rather than forcing it. Acrylic can chip or crack under vibration, and friction can soften its edge. Pause if the cut starts to wander or the material feels warm.

Measure, Mark, and Secure the Acrylic Sheet

Before cutting clear acrylic, let the sheet rest flat on a clean, stable work surface. Measure the opening or finished piece at two points; walls and frames are not always perfectly square. Mark the cut line on the protective film with a fine marker, then check the measurement again. If the film is missing, use low-tack masking tape to make the line easier to see and reduce surface scratches.

Align a straightedge with the marks and verify that it cannot shift. Account for the blade’s kerf, or the small amount of material the cut removes, so the finished piece is not undersized. Support both sides of the cut, especially near the edge. Use padded clamps to hold the sheet securely, but do not tighten them hard. Excess pressure can create stress around the cut line. It sounds fussy. It helps.

Tips: Keep the sheet flat, and place a scrap board beneath it if needed. Check that the marked line remains visible from your cutting position. Remove dust before measuring; a single grain can nudge a ruler off course. I sometimes recheck a mark after clamping, because tightening can shift the sheet slightly. If it moved, reset it before cutting.

Cut Along the Mark with Steady, Controlled Pressure

Place the clear acrylic sheet on a clean, flat surface, leaving the marked line easy to reach. Keep the protective film on while you work. Align a rigid straightedge with the mark and secure it so it cannot creep. A slight shift can spoil an otherwise clean cut.

For thin sheets, draw an acrylic scoring tool along the straightedge with steady, controlled pressure. Make several light passes rather than forcing one deep groove. Let the tool follow the same track; uneven pressure can send it wandering. Keep your free hand clear of the cutting path. Slow is better.

Check the groove in good light. It should look continuous, not jagged. For a suitable thin sheet, place the scored line just beyond a firm table edge, then apply gentle, even pressure to the overhanging section. Don’t twist it. If the sheet is thick, or the score feels shallow, use a saw suited to acrylic instead of trying to snap it. I’ve seen a rushed final pass cause more trouble than the first few; it is tempting to push harder, but that often invites chips or cracks. Wear eye protection, and smooth the cut edge with fine abrasive paper if needed.

Smooth the Edges and Check for Cracks

A clean cut is only half the job; the edge needs careful finishing. Let the acrylic cool before sanding, since heat and pressure can increase stress. Begin with fine wet-and-dry abrasive paper, around 400 grit, then move to 600 or 800 grit. Keep the paper and edge damp. Use light, even strokes, and avoid pressing hard on corners. A bright work light helps reveal tiny white lines, chips, or hairline cracks that may be easy to miss.

Inspect both faces and the full edge, especially near the cut’s start and finish. PMMA engineering data measured using ASTM D696 commonly reports linear thermal expansion near 70 µm/m·°C; the exact value varies by sheet grade and temperature. That movement makes overheating worth avoiding. ASTM D4802 covers acrylic sheet specifications, but it does not promise one crack-free cutting setting for every sheet. Test your sanding and polishing method on scrap first. I still check twice. Small flaws can grow under load.

Tips: Wipe the edge with a soft, clean cloth and inspect it under angled light. Don’t force a flame-polishing pass over a questionable edge; reheating can conceal damage without removing the underlying stress. If you see a crack, stop and reassess the cut before fitting the sheet.